
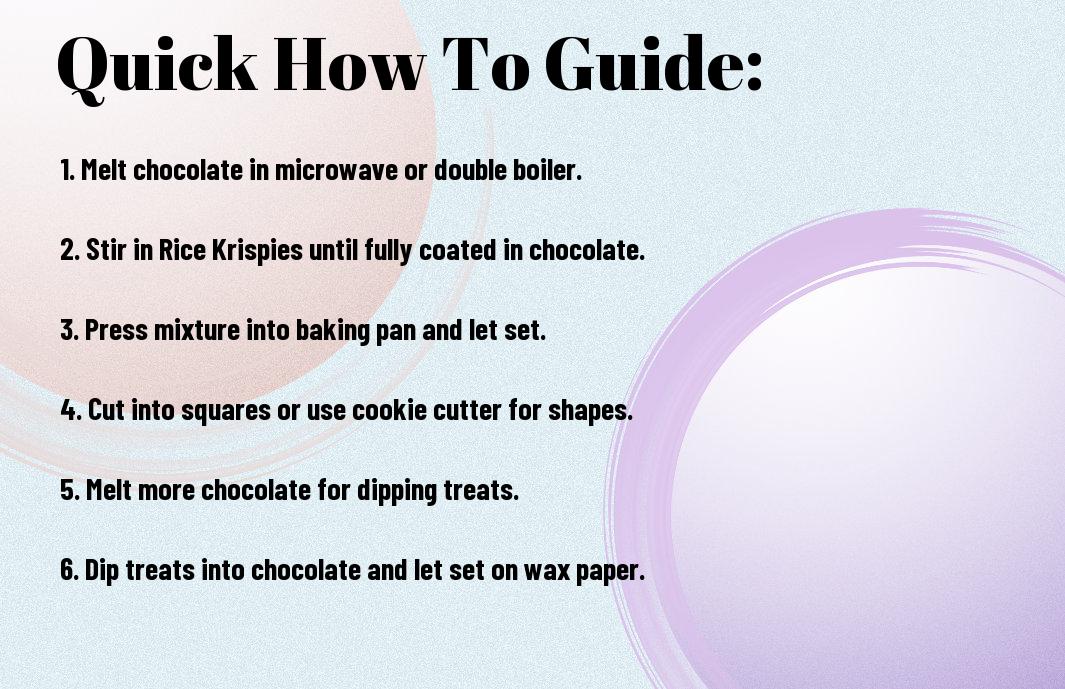
If you’re craving a delightful combination of crunchy and chewy, then chocolate covered Rice Krispie treats are the perfect choice for you. This sweet treat is a beloved classic and is surprisingly easy to make. In this guide, I’ll walk you through the simple steps to create these delicious snacks at home, along with some tips to ensure they turn out perfectly every time.
To start, you’ll need a few key ingredients, including Rice Krispies cereal, marshmallows, butter, chocolate chips, and a bit of cooking spray. Additionally, you’ll also need a double boiler or microwave safe bowl for melting the chocolate. While this recipe is straightforward, there are a few important details to keep in mind to ensure your chocolate covered Rice Krispie treats turn out just right.
Key Takeaways:
- Prepare the Rice Krispie treats: Follow the traditional Rice Krispie treat recipe, and allow them to cool in a pan.
- Melt the chocolate: Use a double boiler or microwave to melt chocolate, stirring until smooth and creamy.
- Dip and drizzle: Dip the treats into the melted chocolate, and then drizzle with additional chocolate for an extra decadent treat.
Understanding the Basics of Rice Krispie Treats
Some of the most beloved sweet treats are the ones that require minimal effort to create. Rice Krispie treats fall into such a category, offering a delightful combination of crispy cereal and gooey marshmallows. If you’re looking to elevate this classic favorite, adding a layer of chocolate can take it to a whole new level of deliciousness.
Origin and Popularity of Rice Krispie Treats
Rice Krispie treats have been a staple in American households since the 1930s when they were first introduced by Kellogg’s. The simple and affordable ingredients, along with the ease of preparation, quickly catapulted the treat to fame. Over time, variations have been made to the original recipe, with additions like chocolate, peanut butter, and even sprinkles, further contributing to its popularity.
The Principal Ingredients and Their Role
The key components of a classic Rice Krispie treat are rice cereal, marshmallows, and butter. The crispy rice cereal provides the signature crunch, while the marshmallows act as a binder and provide the necessary sweetness. The butter helps to bring everything together and adds a rich flavor to the treat. When combined, these ingredients create a chewy, crunchy, and sweet dessert that appeals to all ages.
Getting Started: Preparing Your Kitchen and Gathering Supplies
After deciding to make chocolate covered Rice Krispie treats, the first step is to prepare your kitchen and gather all the necessary supplies. This is an important phase in ensuring that the process runs smoothly and efficiently, allowing you to focus solely on creating delicious treats. Here are some tips and essential tools to consider as you get started.
Tips for a Clean and Efficient Kitchen Setup
When preparing to make chocolate covered Rice Krispie treats, it’s crucial to start with a clean and organized kitchen. Clear your countertops, wash any dishes or utensils you’ll be using, and ensure you have enough space to work comfortably. This will prevent any potential messes from cluttering your workspace and minimize the risk of cross-contamination.
- Designate a specific area for preparing and decorating the treats.
- Keep cleaning supplies, such as paper towels and sanitizing spray, within reach for quick cleanups.
- Organize your ingredients and tools in a way that makes them easily accessible.
The key is to set up a kitchen environment that allows you to move efficiently and maintain a high level of cleanliness throughout the process.
Fundamental Tools and Appliances for Making Chocolate Covered Rice Krispie Treats
As you prepare to make chocolate covered Rice Krispie treats, it’s essential to have the right tools and appliances on hand to streamline the process. The most important items include a large mixing bowl, a sturdy spatula for stirring the melted chocolate and cereal, a baking sheet or tray for setting the treats, and a microwave or double boiler for melting the chocolate.
Additionally, having a silicone spatula for spreading the chocolate evenly over the treats and a cooling rack for allowing the chocolate to set are highly recommended. These tools will help you achieve a smooth and professional-looking finish on your chocolate covered Rice Krispie treats.
Shopping Guide: Selecting the Best Ingredients
To make the best chocolate covered Rice Krispie treats, you need to start with the highest quality ingredients. This shopping guide will help you select the best Rice Krispies cereal, marshmallows, and chocolate for your delicious treat.
Picking the Perfect Rice Krispies Cereal
When choosing the Rice Krispies cereal for your treats, look for a brand that offers the crispiest and freshest cereal. Check the expiration date to ensure the cereal is fresh and crispy. You want the cereal to maintain its crunchiness even after being covered in chocolate, so freshness is key. Additionally, consider opting for a whole grain or gluten-free option if you have dietary restrictions or preferences.
Choosing High-Quality Marshmallows
When selecting marshmallows for your chocolate covered Rice Krispie treats, aim for high-quality marshmallows. Look for marshmallows that are soft and fresh, with a smooth and creamy texture. You want the marshmallows to melt easily and evenly when mixed with the cereal, so avoid any stale or hardened marshmallows. Organic or natural marshmallows can also be a great option if you prefer to avoid artificial ingredients.
Factors to Consider When Buying Chocolate for Coating
When it comes to choosing chocolate for coating your Rice Krispies treats, there are a few important factors to consider. First, opt for high-quality chocolate with a rich cocoa flavor. Whether you choose milk, dark, or white chocolate, make sure it is of the best quality to enhance the overall taste of your treats. Second, consider the melting point of the chocolate. You want a chocolate that melts easily for a smooth and glossy coating. Finally, recognizing the importance of using chocolate specifically formulated for melting and coating will ensure that your treats have the perfect chocolate finish.
Step-by-Step Recipe: How to Make Rice Krispie Treats
After gathering all the necessary ingredients, you are ready to start making your delicious chocolate-covered Rice Krispie treats. This recipe is simple and easy to follow, and the result is a tasty and visually appealing dessert that everyone will love.
| Ingredients | Instructions |
| Rice Krispies cereal | Melt the butter in a large saucepan over low heat. Add the marshmallows and stir until completely melted. Remove from heat. |
| Butter | Add the Rice Krispies cereal and stir until well coated. |
| Marshmallows | Press the mixture into a greased 9×13-inch baking dish. Let it cool. |
| Chocolate chips | Melt the chocolate chips in a microwave-safe bowl, stirring every 30 seconds until smooth. Spread the melted chocolate over the cooled treats. |
Mixing the Rice Krispies and Melting Marshmallows
When mixing the Rice Krispies and melting the marshmallows, it’s important to pay attention to the heat and consistency of the mixture. You want to melt the marshmallows and butter together over low heat to avoid burning them. Stir constantly until the marshmallows are completely melted and the mixture is smooth. Once melted, quickly add the Rice Krispies cereal and stir until they are well coated. The key is to work quickly as the mixture can become firm and difficult to shape if it cools too much.
Tips for Shaping and Cooling the Rice Krispie Treats
Shaping and cooling the Rice Krispie treats is an important step in the process. After pressing the mixture into the baking dish, it’s crucial to let it cool completely before adding the chocolate. This will ensure that the chocolate spreads evenly and doesn’t melt the treats. Once the chocolate is spread, it’s recommended to place the treats in the refrigerator for faster cooling. Using a sharp knife, cut the treats into squares or rectangles. Perceiving the right consistency can be tricky, but with practice, you will achieve perfect Rice Krispie treats every time.
- Let the treats cool completely before adding the chocolate.
- Refrigerate for faster cooling.
- Cut with a sharp knife into desired shapes.
Advanced Stage: Making the Chocolate Coating
However, the real magic happens when you start working on the chocolate coating. This step requires a bit of finesse and technique to get that perfect, smooth layer of chocolate to cover your delicious Rice Krispies treats. Here are some tips to help you through the process:
- Choosing the Right Chocolate:
| Melting Method: | Double boiler or microwave |
| Temperature: | Melt chocolate at a low temperature (around 110°F for dark chocolate, 105°F for milk or white chocolate) |
| Cooldown: | Allow the chocolate to cool slightly before dipping the treats |
- Technique for Dipping:
| Tools: | Use a fork or dipping tool to fully coat the treat |
| Method: | Submerge the treat in the melted chocolate, gently shake off excess, and place on parchment paper to set |
| Even Coating: | Ensure an even coating all around the treat for a professional look |
The Different Methods of Melting Chocolate
When it comes to melting chocolate for your Rice Krispie treats, there are a few methods you can use. The most common and reliable methods are using a double boiler or microwave. Using a double boiler involves placing a heatproof bowl over a pot of simmering water, while the microwave method involves heating the chocolate in short intervals, stirring in between until fully melted. Both methods require careful attention to temperature and frequent stirring to avoid scorching the chocolate.
Best Practices for Dipping Rice Krispie Treats in Chocolate
When it comes to dipping Rice Krispie treats in chocolate, there are a few best practices to keep in mind. Firstly, make sure the treats are cool and firm before dipping, as warm treats can cause the chocolate to seize. Additionally, using a fork or dipping tool to fully coat the treat and allowing excess chocolate to drip off will help ensure a smooth and even coating. Lastly, placing the dipped treats on parchment paper to set will prevent sticking and create a professional-looking finish.
Additional Tips, Tricks, and Variations
Despite the simplicity of making chocolate covered Rice Krispie treats, there are a few tips and tricks that can help you perfect your recipe. Here are some additional tips to help you make the best chocolate covered Rice Krispie treats:
- Use high-quality chocolate for the best flavor and texture
- Allow the chocolate to set completely before cutting the treats into squares
- Experiment with different flavors of Rice Krispie cereal for a unique twist
- Try adding a sprinkle of sea salt for a sweet and salty flavor
- Use a double boiler to melt the chocolate for a smooth, creamy texture
Though making chocolate covered Rice Krispie treats is a simple process, these tips and tricks will help you achieve a perfect result every time.
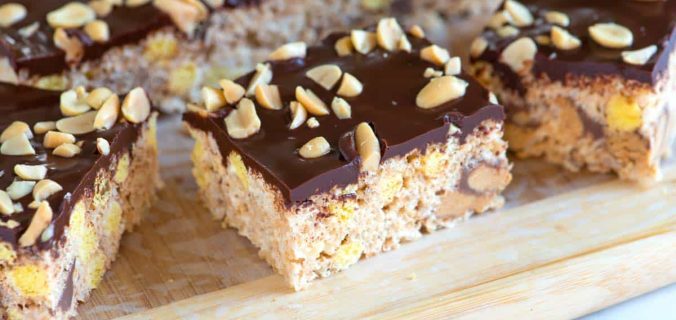
Enhancing Your Chocolate Covered Rice Krispie Treats with Toppings and Flavors
Once you have mastered the basic recipe for chocolate covered Rice Krispie treats, you can experiment with different toppings and flavors to take your treats to the next level. Consider adding chopped nuts, sprinkles, or even a drizzle of caramel or peanut butter to add extra flavor and texture to your treats. You could also add a teaspoon of vanilla extract to the melted chocolate for a hint of extra flavor.
Storing and Freezing Chocolate Covered Rice Krispie Treats
After making a batch of chocolate covered Rice Krispie treats, you may find yourself with leftovers. The good news is that these treats can be stored in an airtight container at room temperature for up to a week. If you want to save some for later, you can also freeze them for up to three months. Be sure to wrap them tightly in plastic wrap and then place them in a resealable plastic bag before freezing to prevent freezer burn.
Chocolate Dipped Rice Krispie Treats
On the whole, making chocolate covered Rice Krispie treats is a straightforward process that yields delicious results. Start by preparing a batch of Rice Krispie treats according to your favorite recipe, and then proceed to dip each treat into melted chocolate. You can use milk, dark, or white chocolate for dipping, and feel free to add sprinkles or other decorations before the chocolate sets. With just a few simple steps, you can create a delightful sweet treat that is sure to be a hit with friends and family.
If you’re looking for a detailed step-by-step guide on how to make chocolate covered Rice Krispie treats, be sure to check out this helpful resource on Chocolate Dipped Rice Krispie Treats. Whether you’re a novice in the kitchen or a seasoned baker, you’ll find all the tips and tricks you need to create these delectable treats. So roll up your sleeves, grab your ingredients, and get ready to enjoy the process of making and savoring your homemade chocolate covered Rice Krispie treats!
FAQ
Q: What ingredients do I need to make chocolate covered Rice Krispie treats?
A: To make chocolate covered Rice Krispie treats, you will need Rice Krispies cereal, marshmallows, butter, chocolate chips, and vegetable oil.
Q: How do I make Rice Krispie treats?
A: In a large saucepan, melt the butter over low heat. Add the marshmallows and stir until melted. Remove from heat and add the Rice Krispies cereal. Stir until well coated. Press the mixture into a 9×13-inch pan and let it cool.
Q: How do I melt the chocolate for the Rice Krispie treats?
A: In a microwave-safe bowl, combine the chocolate chips and vegetable oil. Microwave in 30-second intervals, stirring after each interval, until the chocolate is smooth and fully melted.
Q: How do I dip the Rice Krispie treats in chocolate?
A: Cut the Rice Krispie treats into squares and line a baking sheet with parchment paper. Using a fork or toothpicks, dip each treat into the melted chocolate until fully coated. Place the dipped treats on the parchment paper and let them set until the chocolate hardens.
Q: How should I store chocolate covered Rice Krispie treats?
A: Store the chocolate covered Rice Krispie treats in an airtight container at room temperature for up to 2 days, or in the refrigerator for up to 1 week.